Wednesday, November 14, 2012

Honey Wheat Bread

This one is for Reba G.  I have had a handful of people in the past few months ask me about making bread. I guess they think I might know something about it. Well, I do make bread, on occasion. So I decided to do a photo tutorial for those who might be novice to the bread-making world and who do not own a bread-maker. I am not a fan of bread makers, but to each his own.  As for recipes, most bread recipes revolve around the same set of ingredients and the same instructions, more or less. But there are slight variations you will come across and these variations often will make or break a recipe in my opinion. After trying a good 8-10 recipes over the past 5 years I have "mine".

Now, as for cost...these loaves break down to be only slightly cheaper than the bread I buy at the store (when it's on sale).  I recommend buying good whole wheat flour. I like the Gold Medal White Whole Wheat. I also like the King Aurther line of flours, they just are more pricey so when I'm feeling flush I'll splurge on them but I usually stick to the less costly options. Now, as for healthier...well, it probably is simply because it's made right here in my kitchen by me and it has no preservatives or additives or funny colorings.  It does take time though...and I'm an impatient sort so some weeks I make bread and some weeks I just pick a loaf or 2 at the store. =)  But onto the topic at hand...

Here is my go-to whole wheat bread recipe. I like this one because it uses honey to sweeten rather than brown sugar.

Makes 1 loaf:
3/4 c warm water (if it feels warm from the tap it's hot enough)
2.5 tsp Fleischman's active dry yeast
3/4 milk
2 Tbsp evoo
2 Tbsp honey
1 tsp salt
2 c APF
2 c whole wheat flour
3-5 Tbsp Vital wheat gluten

0. Remove your rings; set them aside in a safe place
1. Place water in large mixing bowl.
2. Add yeast. Stir with a fork.

3. In a small bowl mix milk, oil, and honey


4. Place in microwave for 30-45 sec (Stir it half way through) until it's slightly warm...again, if it feels warm to the touch it's warm enough. It does not need to be terribly warm, much less hot.

5. Dump the milk mixture into the yeast/water. Stir well. Add salt.


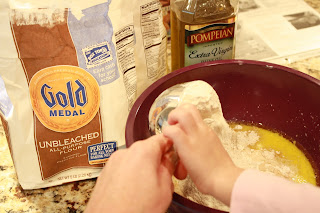
You like those little hands and kiddie fork?  I had a little "helper"...

6. Dump in 1 c APF and 1 c whole wheat flour; 3 Tbsp vital wheat gluten. Stir with a fork. It will be sticky. Be sure to scrape the sides and bottom well. Stir until you can't see much flour left.


7. Add 1 c APF and 1 c whole wheat flour again. Stir with a fork until it's clumpy. Douse your hands with EVOO and powder your counter with flour and knead the dough using your knuckles--I actually just kneaded mine in the bowl until the very end and then flipped it onto the counter for a few kneads.  Add several tablespoons of flour (you choose which one)  and re-oil your hands as needed until you achieve a nice smooth, elastic dough.  Form into a nice neat ball.


8. Grease a large bowl and place the dough into the bowl; flip it once so the top of the dough is coated lightly with oil/grease.  Now cover the bowl tightly with plastic wrap. Set it in a relatively warm place (outside in the summer!) or on your stovetop with the oven on below. Let it sit for an hour or so until it doubles in size. (I forget sometimes about my bread so this loaf actually rose for about 2-3 hours the first time). ***

9. Once it's doubled, take it out of the bowl and slightly roll it out and roll it up jellyroll style into a "loaf". Place it in a lightly greased bread loaf pan and coat the top lightly with oil, cover lightly with plastic wrap again. Let it sit and rise for another hour or so.
10. Preheat your oven to 375F. Place on the middle rack in the middle of the oven and bake 25-35 min until it thumps and sounds "hollow". $$$
I lined my loaf pan with parchment paper and lightly sprayed it with non-stick spray...it makes for a much easier, quicker clean-up!


***At this point you can freeze it by placing it in a lightly greased ziplock bag and getting all the air out. Immediately place it in the freezer.  To bake, remove from freezer, remove from bag; place in lightly greased loaf pan and allow it to thaw completely, come to room temp and rise until it's ready to bake.  Bake at 375 for 25-35 min.
$$$ you may have to loosely cover the loaf with foil about 1/2-3/4 way through the cooktime to prevent it from burning on the top; I usually cover mine after about 20 min.
Remove, dump out, cool and eat it all up!!

Wednesday, November 7, 2012

Brownies


 Does it get much better than brownies?! Chocolate. Cakey, but still kind of fudgey. Cookie-ish. One-pan wonders. They are the workhorse of baked goods I think. As I previously mentioned in the pear tart post, Senor requested brownies this week. For once, I was sad he had chosen a chocolate dish.


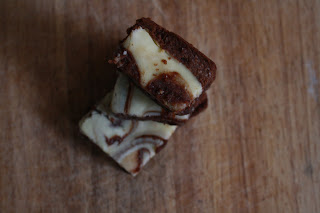
 Now, don't think for a second that prevented me from eating some, because it didn't. I had come across a recipe in SL and it had, of course, some tempting photos of brownies with variations on the basic recipe listed. Senor scoured the page and settled on the cream-cheese swirl brownies. I was sort of hoping he'd pick the Rocky Road Brownies (what, with marshmallows, pecans, chocolate sauce?! What could be lacking?) or perhaps the caramel turtle ones...again, pecans, brownie and caramel. No downsides I can see. He was firm in his decision so the cream-cheese swirled brownies were born. I think they're alright.

Maybe I'm just not in the mood for them I don't know; they just have not wowed me in any particular way. Senor, on the other hand has raved about them all week. So if you're in the mood for brownies and want to try something a little daring...have at these. They certainly aren't repulsive or inedible. I think I just wasn't in a brownie mood this week.

 Simple Brownies with Chocolate Frosting
4 oz unsweetened chocolate baking bar, chopped
3/4 c butter
2 c sugar
4 large eggs
1 c all-purpose flour

 8 oz cream cheese, softened
1/4 c sugar
1 egg yolk
1 tsp vanilla extract

 1. Preheat oven to 325F
2. Microwave chocolate and butter in large microwave-safe bowl on high 1- 1.5 min or until melted and smooth; stirring at 30 second intervals. Whisk in the sugar and eggs until well blended. Stir in flour. Spread the batter into a greased 9x13 pan.  (you can only schmear half the batter, then dollop cream cheese mixture --as directed below and then finish off with the remaining brownie batter if you like...they're your swirl brownies!)
3. In separate mixing bowl beat cream cheese, 1/4 c sugar, 1 egg yolk and vanilla at medium speed with electric mixer until smooth.
4. Dollop cream cheese mixture over brownie mixture and swirl together using a paring knife. Bake 35-40 min. Cool. Eat. Reflect. Consider future variations on the simple brownie recipe. Drink some milk.

Sunday, November 4, 2012

Pear Tart

Yum. When Senor and I first met he told me all about France. He talked about the food alot. He told me his all-time favorite treat in France was a pear tart. Well, when I was pregnant with Luvbug we went to France and I was able to experience this pear tart for myself. Oh it was good. So, so good.

Last week pears were on sale for dirt cheap and they were RIPE. I bought about 15 lbs (okay maybe not that much...but I bought alot) of pears and brought them home determined to not allow a single bit of them to waste.

I started searching for recipes and came across this.  I trust Dorie. I began to calculate if I had enough almonds. I then had to figure out how to blanch and ground them. I used my food processor to ground them up until they were fine like flour.

I did not get a picture of the tart. It was amazing. I want to make another one right now but Senor has requested brownies this week. *sniff.

The only problem I had (other than my food processor being WAAAAY to small...it's a 2c size) was the crust. I never could figure out how dough-like it should be before pressing it into the pan and it also overcooked I think even though I followed the directions for refrigeration and cook time. So in short, the recipe is pretty easy to follow; however be careful to make a sugar cookie consistency type dough for the crust, press it LIGHTLY into the pan, and I would recommend putting the tart pan on top of a cookie sheet to bake and decreasing the bake time.

Poaching the pears was well worth the extra time and effort. The filling was not too difficult.

IT is a recipe that requires some time and patience but it is OH. SO. WORTH IT!!

Birthday Cake

For the girls' joint birthday party I wanted to try my hand at making a cute cake. I knew it would probably involve fondant, lots of it, too. I knew I'd need a large variety of colors. Purchasing that much was against my frugal religion. I mulled over the options for a few weeks and finally decided to try my hand at making fondant. I researched the various ways to make it and settled on marshmallow fondant. Holy lucky knuckle balls why had I not try this before?! It was so stinkin' easy!!!  I am working hard to figure out when I can use fondant again!


As for the cake itself I wanted something fall-ish and something different from your run-of-the-mill birthday cake varieties. We were going to a pumpkin patch for part of the festivities...pumpkin cake, of course came to mind. I went searching for recipes.

In the end I settled on this recipe for the cake and icing. I used this recipe for the fondant. I used Wilton's gel icing colors to get the colors I wanted. I did not tweak anything in the recipes. I made double so I had enough for 3 9" rounds and a few big cupcakes (I stacked 2 on top of each other for CJ's smash cake)

I had a blast creating this cake. It did not turn out how I had planned or envisioned but it tasted de.li.cious. and my girls loved it.