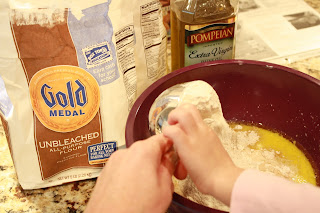
Now, as for cost...these loaves break down to be only slightly cheaper than the bread I buy at the store (when it's on sale). I recommend buying good whole wheat flour. I like the Gold Medal White Whole Wheat. I also like the King Aurther line of flours, they just are more pricey so when I'm feeling flush I'll splurge on them but I usually stick to the less costly options. Now, as for healthier...well, it probably is simply because it's made right here in my kitchen by me and it has no preservatives or additives or funny colorings. It does take time though...and I'm an impatient sort so some weeks I make bread and some weeks I just pick a loaf or 2 at the store. =) But onto the topic at hand...
Here is my go-to whole wheat bread recipe. I like this one because it uses honey to sweeten rather than brown sugar.
Makes 1 loaf:
3/4 c warm water (if it feels warm from the tap it's hot enough)
2.5 tsp Fleischman's active dry yeast
3/4 milk
2 Tbsp evoo
2 Tbsp honey
1 tsp salt
2 c APF
2 c whole wheat flour
3-5 Tbsp Vital wheat gluten
0. Remove your rings; set them aside in a safe place
1. Place water in large mixing bowl.
2. Add yeast. Stir with a fork.
3. In a small bowl mix milk, oil, and honey
5. Dump the milk mixture into the yeast/water. Stir well. Add salt.
 |
| You like those little hands and kiddie fork? I had a little "helper"... |
6. Dump in 1 c APF and 1 c whole wheat flour; 3 Tbsp vital wheat gluten. Stir with a fork. It will be sticky. Be sure to scrape the sides and bottom well. Stir until you can't see much flour left.
7. Add 1 c APF and 1 c whole wheat flour again. Stir with a fork until it's clumpy. Douse your hands with EVOO and powder your counter with flour and knead the dough using your knuckles--I actually just kneaded mine in the bowl until the very end and then flipped it onto the counter for a few kneads. Add several tablespoons of flour (you choose which one) and re-oil your hands as needed until you achieve a nice smooth, elastic dough. Form into a nice neat ball.
8. Grease a large bowl and place the dough into the bowl; flip it once so the top of the dough is coated lightly with oil/grease. Now cover the bowl tightly with plastic wrap. Set it in a relatively warm place (outside in the summer!) or on your stovetop with the oven on below. Let it sit for an hour or so until it doubles in size. (I forget sometimes about my bread so this loaf actually rose for about 2-3 hours the first time). ***
9. Once it's doubled, take it out of the bowl and slightly roll it out and roll it up jellyroll style into a "loaf". Place it in a lightly greased bread loaf pan and coat the top lightly with oil, cover lightly with plastic wrap again. Let it sit and rise for another hour or so.
10. Preheat your oven to 375F. Place on the middle rack in the middle of the oven and bake 25-35 min until it thumps and sounds "hollow". $$$
 |
| I lined my loaf pan with parchment paper and lightly sprayed it with non-stick spray...it makes for a much easier, quicker clean-up! |
***At this point you can freeze it by placing it in a lightly greased ziplock bag and getting all the air out. Immediately place it in the freezer. To bake, remove from freezer, remove from bag; place in lightly greased loaf pan and allow it to thaw completely, come to room temp and rise until it's ready to bake. Bake at 375 for 25-35 min.
$$$ you may have to loosely cover the loaf with foil about 1/2-3/4 way through the cooktime to prevent it from burning on the top; I usually cover mine after about 20 min.
Remove, dump out, cool and eat it all up!!


1 comment:
Thanks! I'll try it in a couple of weeks and let you know how it turns out. We aren't huge bread-eaters, but that may change if it tastes as delicious as it looks.
Post a Comment